How to Speed Up BlueStacks and Fix Lag in Windows 10

Why is BlueStacks so slow?
But before we dive in, let's compare BlueStacks to another popular emulator, Nox. And for example, when I tried to run PUBG Mobile on BlueStacks, it was almost unplayable due to the lags. So, let's get started and fix those lag issues!
Bluestacks is slow: How to make Bluestacks faster in Windows 10
Method 1. Update BlueStacks
Hey there! Before we get started, it's important to have the most up-to-date version of BlueStacks on your Windows PC. BlueStacks 4 is a whopping eight times faster than its predecessor, so we definitely suggest using the latest version for optimal performance.
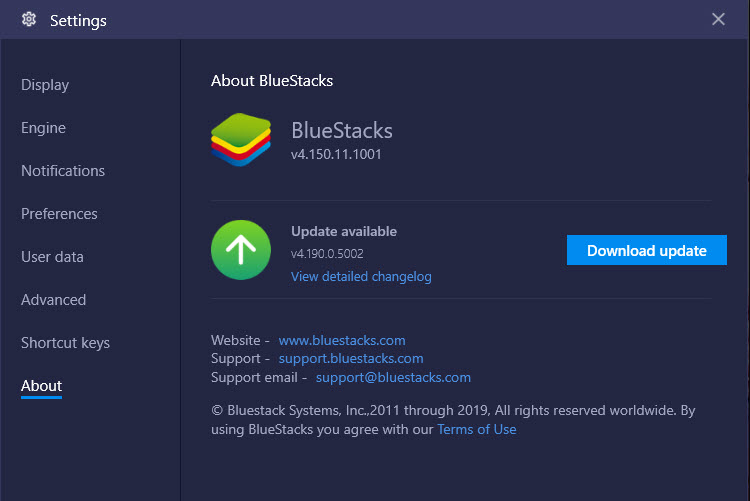
You can also download BlueStacks 4 latest version from this source.
Method 2. Best Settings For Bluestacks Lag Fix
There are many in – Bluestacks settings such as allocating more processor, more ram, changing the DPI settings, and more for Bluestacks to run more perfectly.
If you have a low-end PC and you are playing the game on higher settings, then definitely Bluestacks will lag. Thus, you have to lower those settings to boost FPS in the Bluestacks emulator.
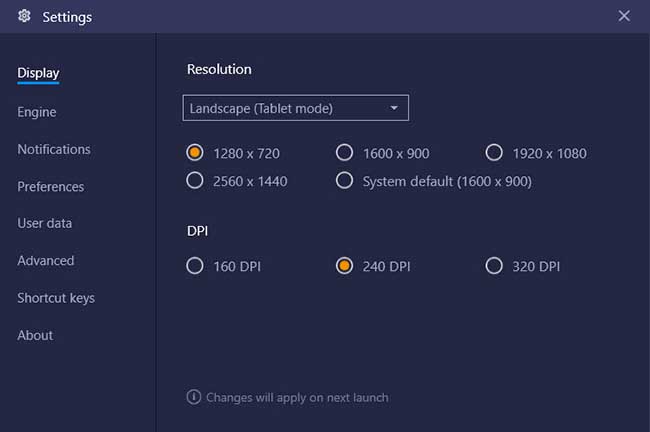
1. Bluestacks Display settings
– Resolution: your monitor resolution
– DPI: 160 or 240
2. Bluestacks Engine Settings For Gaming
– Graphics Mode:
- OpenGL or DirectX.
- Use Advanced Graphics Engine: Enabled.
– GPU Settings
- Prefer dedicated computer graphics: Enabled (NVIDIA only).
- ASTC Texture: Hardware Decoding.
– Performance: Custom
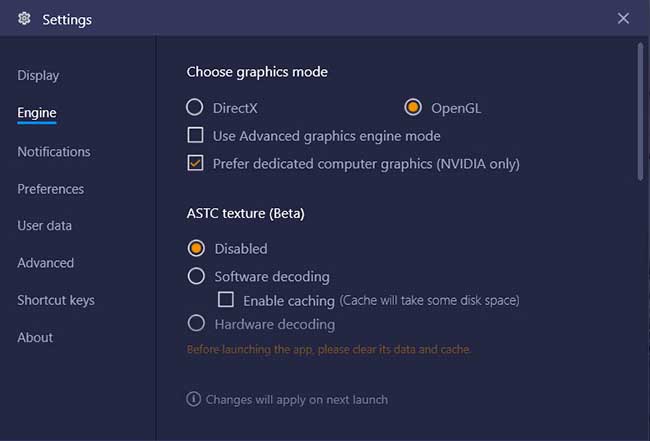
– CPU Cores
- Choose the number of CPU cores you have.
- FPS: 60 FPS is the best for most games.
Method 3. You’ll have to disable Hyper-V and other hypervisors
Since BlueStacks uses virtualization technology, when other hypervisors like Hyper-V, VMWare, VirtualBox are running, it may impair your ability to run optimally.
Here are the steps to disable Hyper-V on your PC:
1. Navigate to Control Panel > Programs > Turn Windows features on or off.
2. Untick Hyper-V in Windows features.
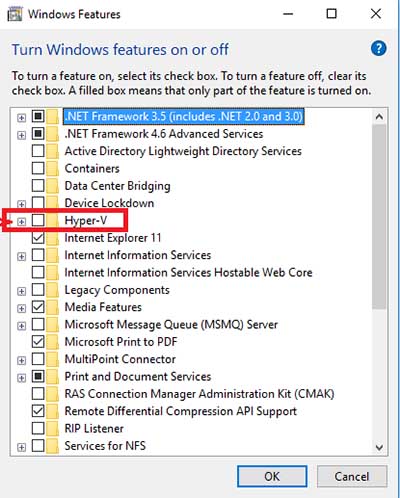
– For Windows 10 Pro 64-bit edition:
- Hyper-V
- Windows Hypervisor Platform
– For Windows 10 Home (Version 1809)
- Virtual Machine Platform
- Windows Hypervisor Platform
– For Windows 10 Home (version 1803)
- Windows Hypervisor Platform
3. Click OK and restart your PC.
Or you can easily disable Hyper-V on your PC using an exe file. Download and double-click the exe from here.
Method 4. Disable Antivirus software
Some antivirus features can interfere with virtualization and cause serious performance degradation. You must disable these features which will help to speed up Bluestacks dramatically. Here are the steps to disable your antivirus program:
1. Double-click the icon that represents your antivirus program such as Avast, AVG, McAfee, Norton, etc.
2. Navigate to your Antivirus dashboard, select on the Real-time protection tab and disable it
3. After that, open Task Manager by pressing Ctrl + Alt + Esc on your keyboard.
4. Switch to the Process tab and click on the Description tab.
5. End all the process which are related to your antivirus program.
\
This comment has been removed by a blog administrator.
ReplyDeleteThis comment has been removed by a blog administrator.
ReplyDeleteThis comment has been removed by a blog administrator.
ReplyDeleteThis comment has been removed by a blog administrator.
ReplyDeleteThis comment has been removed by a blog administrator.
ReplyDeleteThis comment has been removed by a blog administrator.
ReplyDeleteThis comment has been removed by a blog administrator.
ReplyDeleteThis comment has been removed by a blog administrator.
ReplyDeleteThis comment has been removed by a blog administrator.
ReplyDeleteComment here